Welcome to our tutorial on how to add a Back-to-top button widget to your web project.
Enhance user experience with a seamless scroll-to-top button that keeps your visitors navigating smoothly.
Whether you want to improve user experience or create a more interactive website, a Back-to-top button can be valuable. This article will walk you through integrating our Back-to-top button widget into your web project.
But if you are only looking for a quick way to add a Back-to-Top button on your website, use Webynize. Our widget is easy to create (code-free), even for users without web design proficiency. Also, you can tailor the button’s appearance to your personal preferences.
Create a Webynize widget today and add a Back-to-Top button to enhance your website’s user experience!

Add Back to Top Button Widget to Website – Step by Step
Ready to add a Back-to-Top button to enhance your website’s UX? Here’s a complete guide on how to do it.
Creating a Webynize Back-to-Top Widget
The first part of our guide will focus on setting up and customizing the widget. Follow these steps:
- Sign up for free to Webynize. You’ll have a 7-day free trial during which you can access all the widgets in our library. After 7 days, you’ll need to choose a monthly plan to continue accessing the premium features.

- Click the +Create Widget button on the top right of your dashboard to access our widget library.
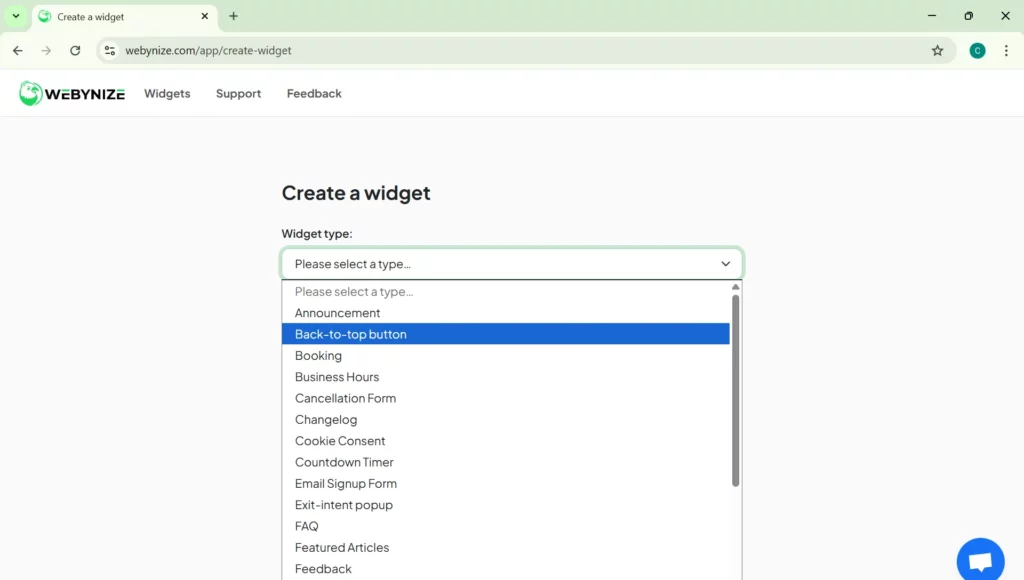
- Click the dropdown menu and select the Back-to-Top button.
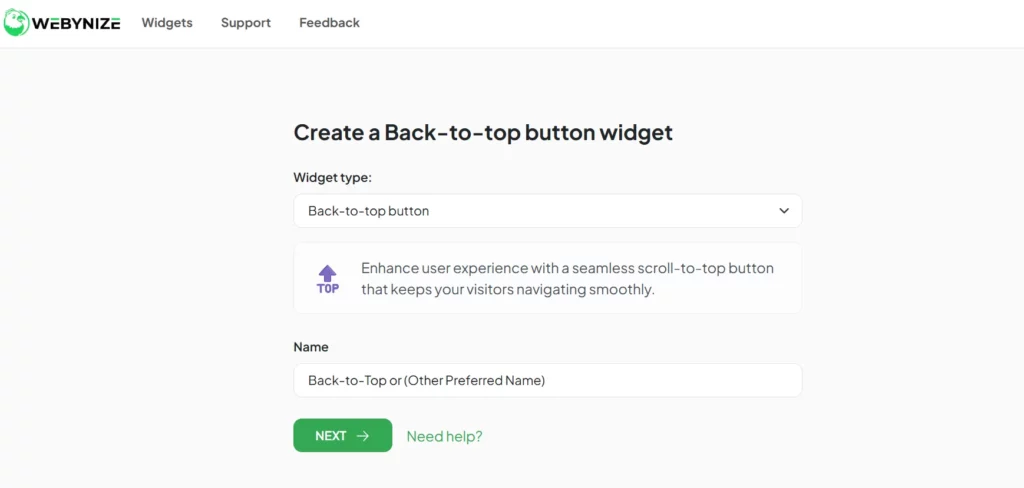
- Provide a custom name for the Back-to-Top widget and click Next to go to the editor panel.
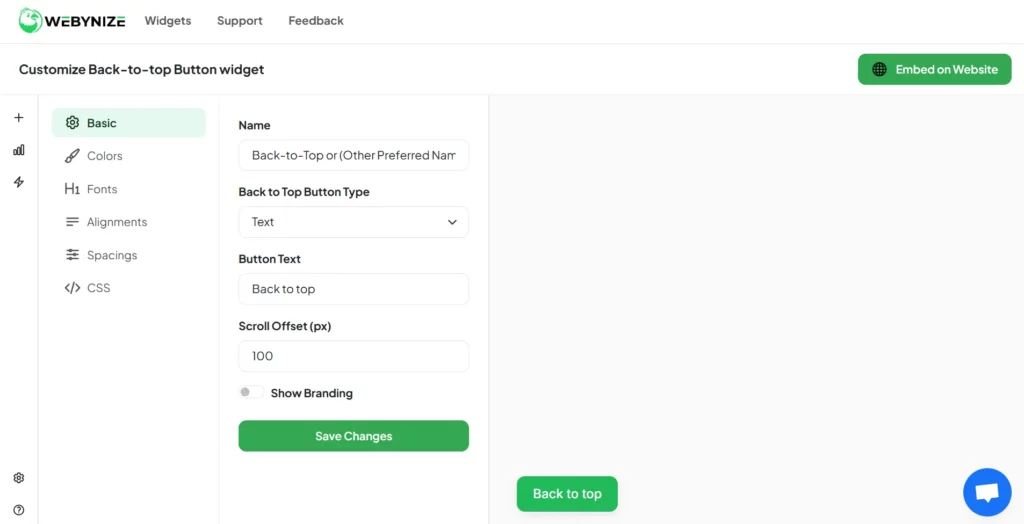
- Customize your widget to your personal preferences. Webynize lets you choose your preferred embed colors and font settings. Also, you can specify where you want the Back-to-Top button to appear on your web pages (Left, Right, or Center). Click Save Changes when through to apply the customization settings to the widget.
- It’s time to copy the embed code. Click Embed on Website on the right corner of your screen and select your web builder.
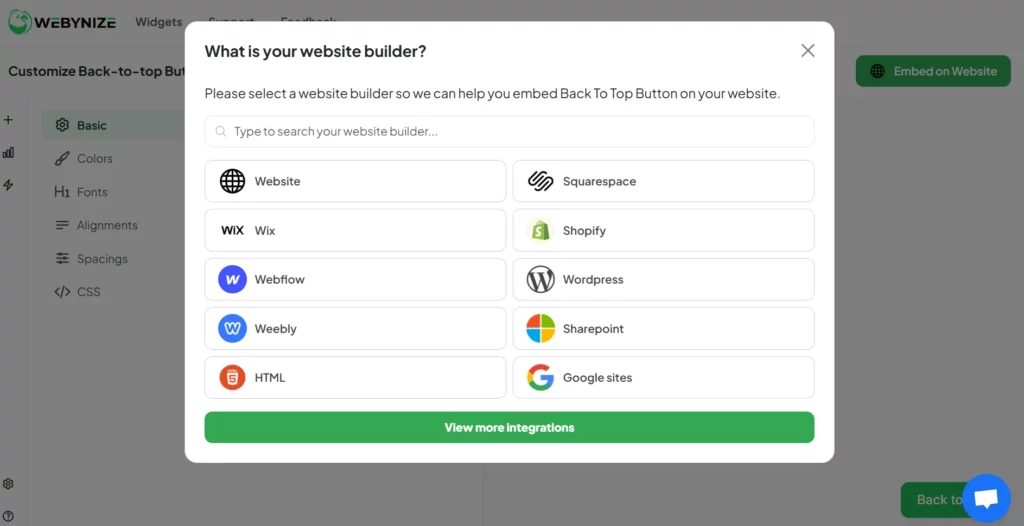
- On the pop-up, click on the Copy code button to copy the JavaScript code.

Add the Back-to-Top Button to Your Website
Once you’ve copied the embed script from our Webynize Back-to-Top button embed code generator, it’s time to paste it on your website. Here’s how to do it:
- Log in to your website admin panel and open the web page(s) where you want to add the Back-to-Top button.

- Open the code editor, rich text editor, or code block section depending on your website builder. Here’s an example of how to do it on a WordPress website.
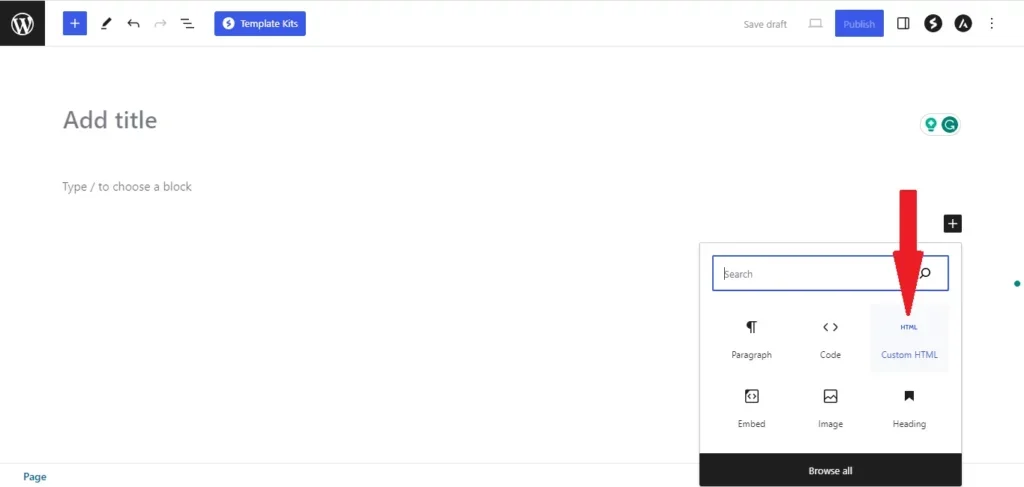
- Paste the embed code copied from Webynize.
- Preview the changes, or select to save and publish the web page.
See how easy it is?
Sign up for Webynize and join thousands of website owners using our widget to add a Back-to-Top button on their web pages!
Video Guide: Embed a Back-to-Top Button on Your Website for Free
Watch our YouTube video below for a tutorial on how to integrate a Back-to-Top Button into your website.
[LIVE-DEMO]
[TESTIMONIALS]
Why Add a Back to Top Button to Your Website?
Here are the key Back-to-Top button benefits for your website:
- Professional Look: Simple features like the Back-to-Top button enhance your website’s appearance and give it a professional touch. This creates a strong impression on first-time visitors, enticing them to stay on your website longer.
- Website Accessibility: People with disabilities often experience limited mobility and find it difficult to scroll long distances. A Back-to-Top button provides a helpful shortcut for navigating your web pages, making your website more inclusive.
- User Experience: Manual scrolling is often hectic for mobile users. Adding a Back-to-Top button addresses this pain point, improving your website’s visitor experience.
- Lead Generation Opportunities: A Back-to-Top button adds to your website’s intuitive navigation, reducing scrolling fatigue. As such, users will likely spend more time on your website and scroll through other web pages, creating conversion opportunities.
When to Use a Scroll Back to Top Button
Here’s the truth: A scroll Back-to-Top button isn’t necessary on every web page. However, when used properly, it enhances your website’s user experience and accessibility. Below are factors to consider when adding a Back-to-Top button on your website:
- Content Type: Consider adding a Back-to-Top button if a web page requires visitors to scroll significantly to reach the bottom. Examples of web pages that require significant scrolling include blog posts, product landing pages, service detail pages, and FAQ sections.
- Single-page Websites: Add a Back-to-Top button on websites where all the main sections (About, Services, and Contact Us) are stacked vertically to make it easy for visitors to return to the top or main menu.
- Infinite Scroll Pages: Use a Back-to-Top button on embedded social media feeds or content streams that continuously load more items as the user scrolls. This makes it convenient for visitors to return to the top of the feed or view the latest posts.

Back to Top Button Examples
Where you position a Back-to-Top button influences its effectiveness and your website’s user experience significantly. Here are examples of where to place a Back-to-Top button on your website:
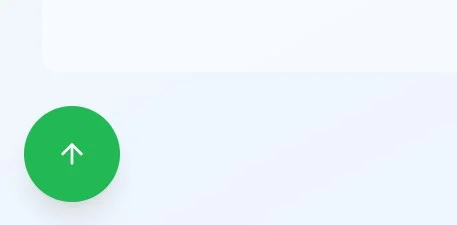
- Lower Right Corner: This is the most intuitive spot to place a Back-to-Top button because visitors naturally check the lower right corner for navigation help. However, we recommend placing the button in the lower right corner if the right side has other widgets, such as the chatbox.
- Sticky Sidebar/Panel: Configure the button to only appear after users scroll down a certain distance. The floating Back-to-Top button placement is especially ideal for web pages with dashboards or data-heavy interfaces.
- Mobile Bottom Edge: Place the Back-to-Top button in a thumb-accessible area. Also, ensure the target area is large enough for easy tapping without accidental presses.
Must-Have Features for Back to Top Buttons
A well-designed “Back to Top” button should do more than just scroll. It should enhance your website’s functionality and user experience. Let’s outline the most essential elements to include in a Back-to-Top button:
- Label: The button should have a ‘Back-to-Top’ text, so it’s easily visible, and users can tell what it does.
- Accessibility: The button should have proper ARIA attributes, so it is compatible with screen readers and for people with visual impairments.
- Flexible Customizations: You should be able to tailor the button’s appearance, especially the theme and shape, to blend with your website’s appearance.
- Responsiveness: The button should auto-adjust to the screen size, ensuring your website visitors have a consistent user experience across devices.
- Fixed/Floating Position: The button should remain in a fixed or relative position as users scroll, so it is easy to identify and use.

Best Practices for a Standout Back to Top Button
Use our cheatsheet below when adding a Back-to-Top button to your website for optimal usability:
- Clear Visual Indicator: Use an up arrow icon to make the Back-to-Top button easily discoverable. Also, include a descriptive label, including an aria attribute, stating what the button does.
- Delayed Appearance: Set the Back-to-Top button to appear when users scroll two screen heights on PC or four screen heights on mobile.
- Make the Button Stationary: Use the ‘position: fixed;’ attribute to ensure the button is placed relative to the viewport. This means it remains in the same place even as users scroll a web page.
- Consistent Styling: Customize the button to either complement or contrast your website or brand theme. The theme you choose depends on how conspicuous the button should be.
- Mobile-First Approach: Position the Back-to-Top button within thumb-friendly zones. Also, add adequate spacing or padding from the borders to mitigate accidental swipes.
- Correct Button Size: Ensure the button is large enough so it is visible, but not too large that it blocks important content.

Need Support?
This tutorial has helped show you how to add a Back-to-top button widget to your web project for FREE!
Still, you might have additional questions about how the Back-to-Top button works or how to integrate it on your website.
Feel free to talk to our customer support desk using the live chat feature on the bottom right of your screen.
Alternatively, reach us through email by sending your inquiries or concerns to [email protected].

Frequently Asked Questions (FAQs)
Let’s wind up this guide by addressing commonly asked questions about adding a Back-to-Top button to a website.
Does a Back to Top Button Slow Down My Website?
No. A Back-to-Top button doesn’t slow down your website. Usually, the code is lightweight, especially for standard buttons. It will only slow down your website if you include unnecessary animations and dependencies.
Should the Button Appear All the Time or Only on Scroll?
No. The button should not appear all the time. It should only appear when users scroll some distance, such as two or four screen heights, for large and small sizes, respectively.
What Is the Best Placement for a Back to Top Button?
The lower right corner is the best placement for a Back-to-Top button, as it is easily visible and discoverable.
Is a Back to Top Button Good for Mobile Websites?
Yes. A Back-to-Top button is good for mobile websites because it improves navigation on long web pages. It also supports one-handed use, encouraging visitors to stay on your website longer.
Conclusion
Adding a Back-to-top button widget can be a simple and effective way to gather valuable insights from your customers and improve the overall user experience of your web project.
Our Webynize widget lets you create and personalize a Back-to-Top button on your website without coding. Also, we have a responsive support team to help you troubleshoot any integration issues you encounter.
Create a Webynize widget today to enhance your website’s intuitive navigation!
We wish you the best of luck with your new Back-to-top button widget!
Leave a Reply