Blocks of text kill engagement and cause visitors to bounce off your website quickly. In fact, a recent Adobe study found that 41% of respondents stopped engaging with content because it was too long.
Adding a timeline widget to your website solves this by making information visually appealing and easy to scan.
Below, we’ll cover how to set up and style your Timeline widget, including best use cases to optimize your website visitor engagement.
How to Add a Timeline Widget to Your Website
Webynize offers the most user-friendly widget for embedding a Timeline feed on your website. No code or technical skills required. Additionally, our Timeline widget is mobile-friendly, ensuring a seamless UX across devices.
Below is a step-by-step guide for adding a Timeline widget to a website:
Creating a Webynize Timeline Widget
Follow these steps to set up and customize your widget:
- Sign up for Webynize and visit our pricing page to pick a plan that works for you. This gives you access to premium features like flexible customization and advanced analytics.

- Click +Create Widget on the top right corner of your screen to access our widget library.
- Open the dropdown menu and select the Timeline widget.
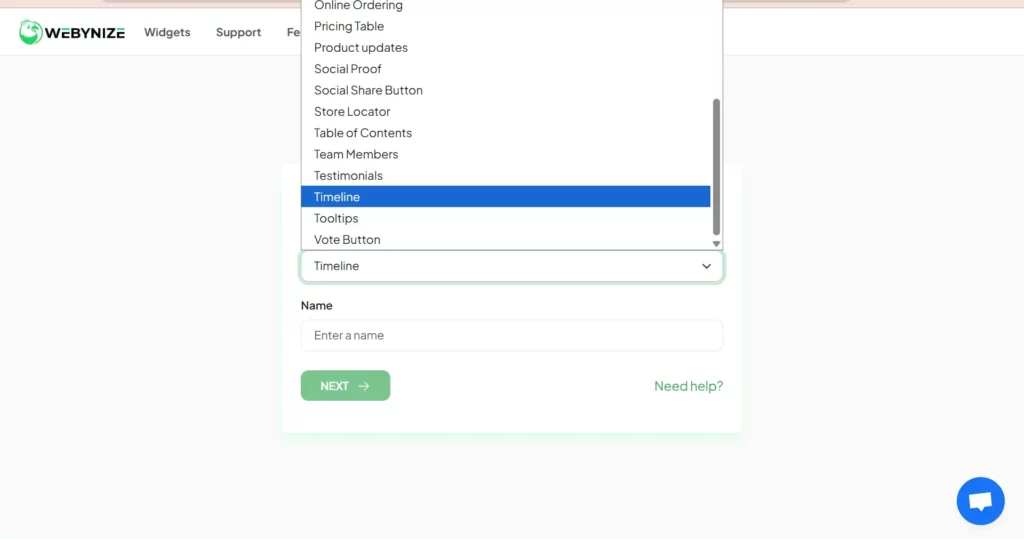
- Input a custom name for the widget and click Next to open the editor panel.

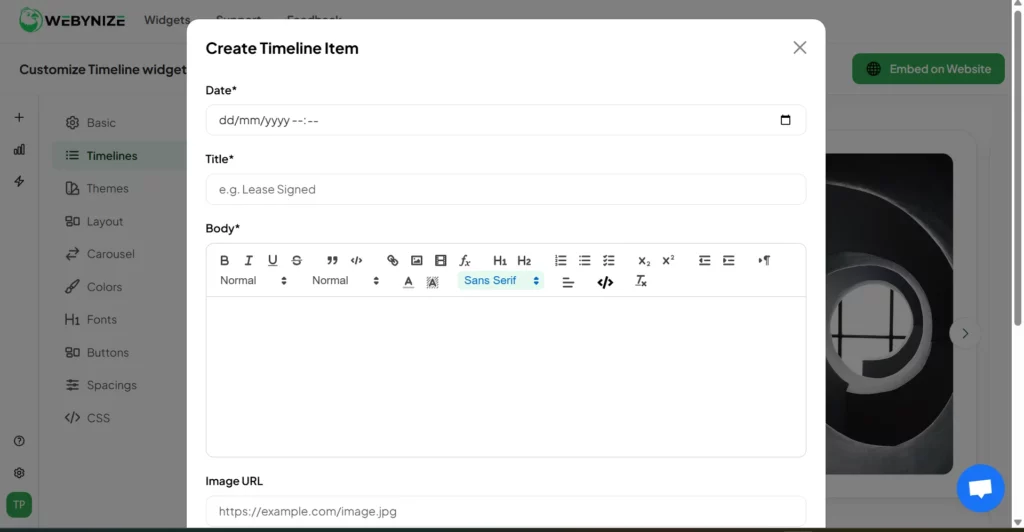
- Navigate to the Timelines tab on the left and click on Add New Timeline to create entries.

- For each entry, input the date, title, brief description of the event, image URL, and CTA. Click Save Timeline Item to add it to your timeline.
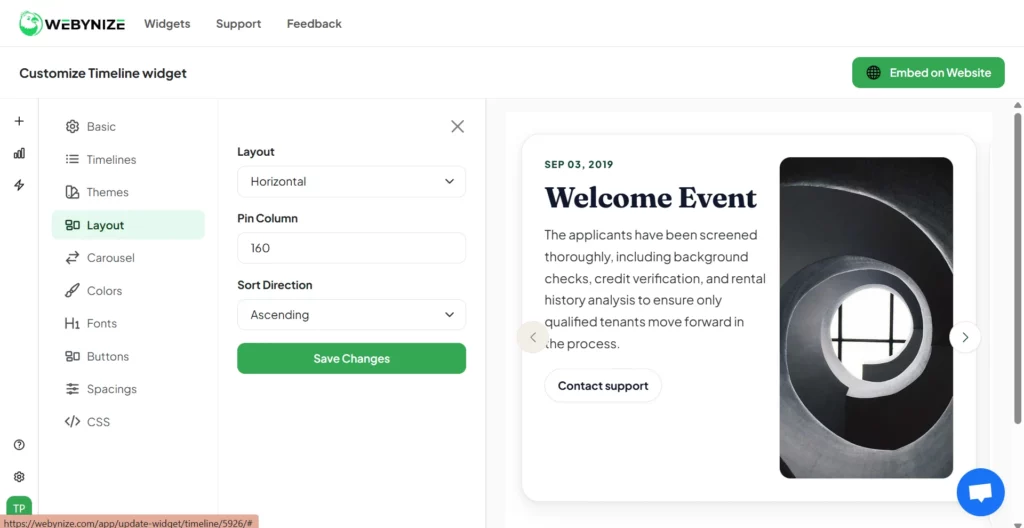
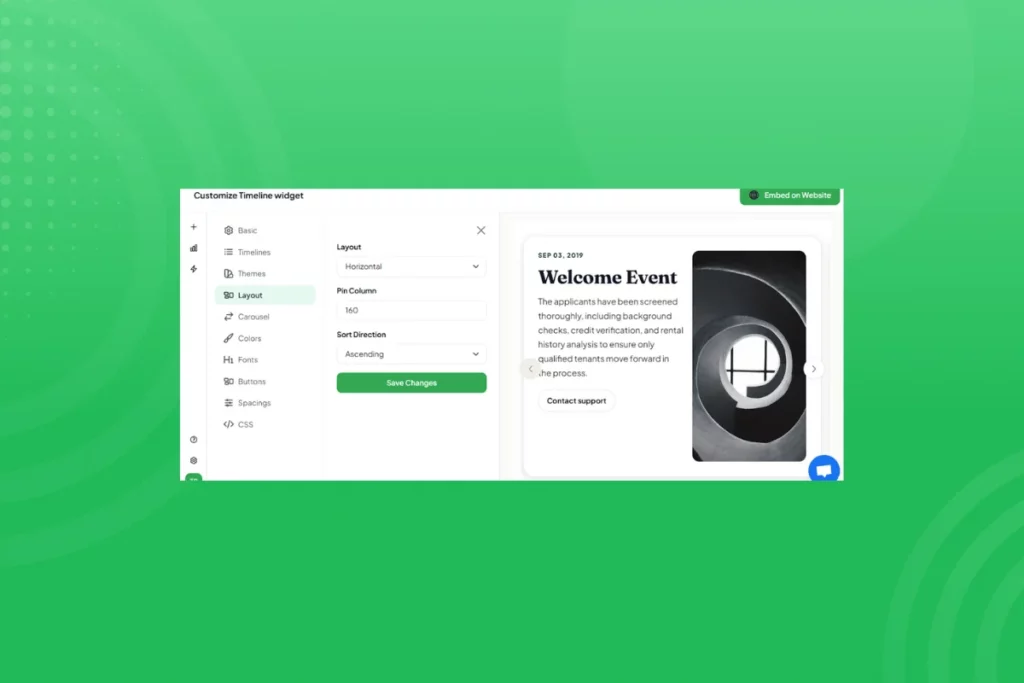
- Once you’ve created all the timeline entries, customize your widget to capture your brand theme. This includes choosing the widget’s layout options (vertical, horizontal, or interactive), style settings, and font colors.
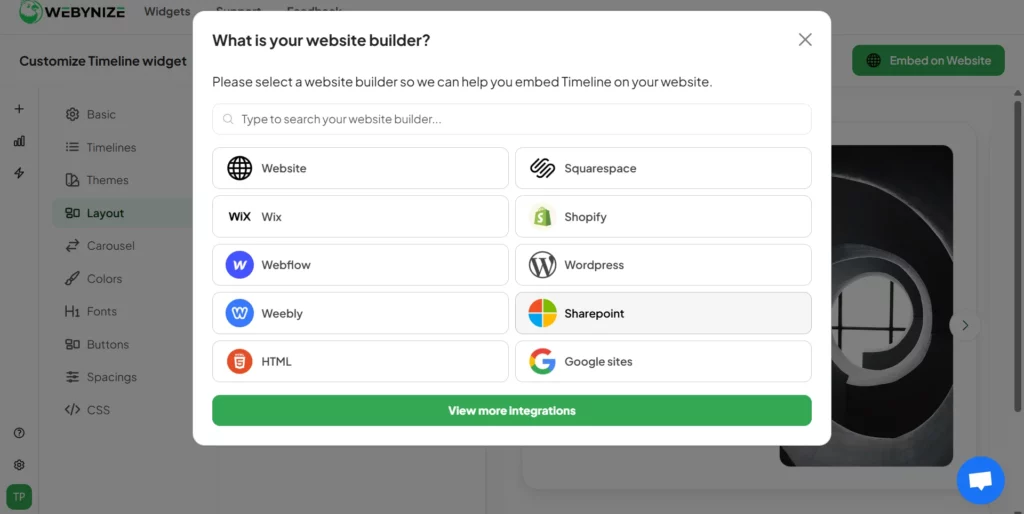
- Click Embed on Website and specify your website type, such as WordPress, Squarespace, or Webflow.
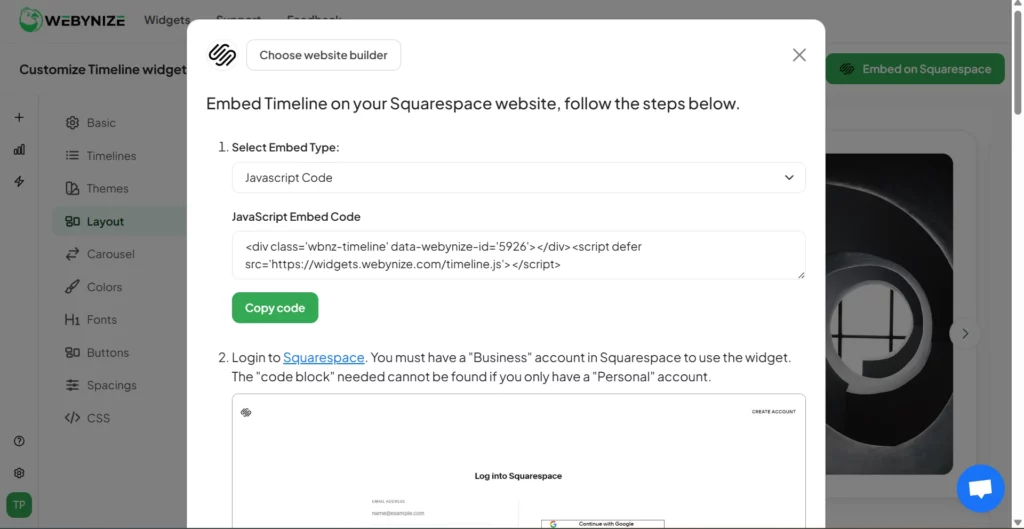
- Copy the script that appears in the pop-up window.
Adding the Timeline Widget to Your Website
You’ve customized your timeline widget and generated the embed script. It’s time to paste it on your website:
- Log in to your website admin dashboard and create a new page or open the one where you want to embed the timeline widget.

- Launch a code block, code editor, or rich text editor, depending on your website type.
Note: Some website builders, like Squarespace, require that you have a business account to add custom/embed code.

- Paste the embed script you copied from Webynize.
- Save the changes and publish the web page so the timeline widget goes live on your website.
It’s that easy! Our no-code widget lets you display a timeline feed on your website in minutes.
Create a Timeline widget and share your brand story to provide social proof for your website.
[LIVE-DEMO] [TESTIMONIALS]What Is a Timeline Widget?
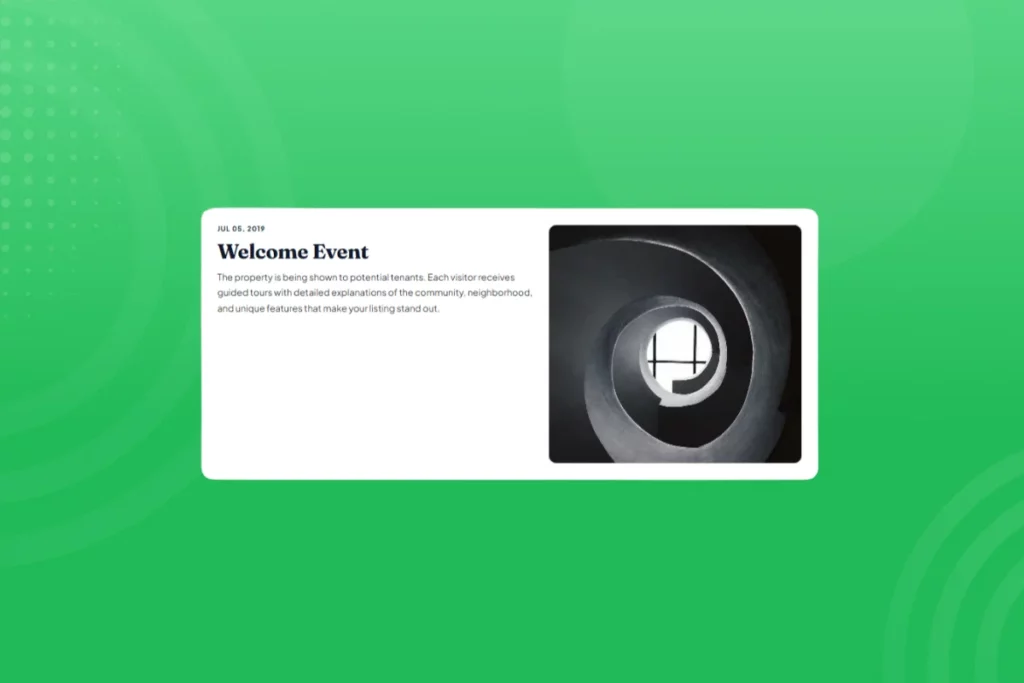
A timeline widget is a design element you add to your website to highlight your company’s products, projects, or history in an interactive format, typically featuring a single scrollable vertical or horizontal axis.
Using a timeline widget helps replace long texts that often turn off visitors before they can finish reading. Also, you can add well-curated images, icons, connectors, and CTAs that encourage visitors to continue engaging with your website.
Other reasons why you need a timeline widget on your website include:
- Adding a timeline widget helps create engaging narratives about your company’s history, project milestones, and products, which in turn help build trust with your customers.
- A well-designed timeline widget revamps your website’s visual appeal, grabbing visitors’ attention quickly.
- Using relevant keywords in your timeline events can help boost your website’s visibility to search engines, improving your SERP ranking.

Best Uses for a Timeline Widget on Your Website
Now that you know what a timeline widget is and why your website needs one, you might be curious about its various use cases. The primary reason for using a timeline widget is to break complex information into digestible, memorable moments that encourage your site visitors to become customers.
Here are several ways to use a timeline widget to tell your brand story or share updates in a way your visitors can follow:
1. Company History
A timeline widget lets you showcase the key milestones, achievements, and other significant events that have shaped your company. This includes founding moments, funding rounds, acquisitions, and the launch of significant products and projects.
The timeline feed provides visitors to your site with immediate context about your company’s growth and maturity, without requiring them to read lengthy paragraphs.
2. Product Development Roadmap
A timeline widget helps you provide a chronological overview of a product’s development. It allows you to showcase the core features you started with, followed by the add-ons included over time, moulding your product into what it is today.
Consequently, your partners and customers gain insight into your priorities and gauge the momentum of the product development cycle.
3. Career Path or Resume Timeline
As a professional or consultant with websites, you can use a timeline widget as your visual resume. Highlight your certifications, job roles, professional history, and key project milestones, or showcase client engagements and testimonials.
Such information allows hiring managers and potential customers to quickly assess your experience and determine whether you will have the desired impact on their projects.
4. Step-by-Step Process
A timeline widget lets you break your process into distinct steps, including client onboarding, service delivery, installation, and post-installation assessments. This enables your customer to understand what to expect from your products or services and informs them where they are in the process.
To make the timeline widget more interactive, you can include links to other resources or add a tooltips widget to provide additional information about your processes.
Top Features of the Timeline Widget
The best timeline widgets do more than just display your progress.
They pull in customers to engage with your story and provide opportunities for introducing website visitors to your conversion funnel:
- Your timeline, your choice: Make every milestone feel monumental. Shape every detail from spacing and colors to fonts and layouts. Make your timeline a part of your brand identity.
- Perfect on every screen: No manual tweaks. No broken layouts. No awkward resizing. The timeline feed automatically adapts to users’ screens, regardless of whether they are using a phone, tablet, or desktop.
- Limitless creativity: Take absolute control of the creative process by adding custom CSS hooks to refine spacing and animations as needed. Achieve brand consistency and uniqueness.
- Versatile: One widget, boundless possibilities. Create a timeline for every process or milestone, including project roadmaps, launches, company history, resumes, or onboarding flows.
- Tell your story your way: Create a narrative around each moment that is emotional, actionable, and memorable for visitors. Build trust and chart a path towards deeper visitor engagement.
How Does a Timeline Widget Improve User Engagement
The way visitors engage with information on a website often comes down to presentation. Readers typically want information that is visually appealing and easily scannable, which is where a timeline widget comes in handy.
An optimized timeline widget boosts visitor engagement in several ways:
- Visual Storytelling: A timeline widget helps break a story into visual steps that readers can follow easily, instead of long paragraphs that often cause them to disengage midway. This keeps visitors engaged with the story, staying on your website longer.
- Interactive Features: The best timeline widgets allow website visitors to interact with the content, such as clicking on visual elements to reveal additional information or explore related media (photos and videos).
- Builds Trust: Showcasing your brand’s evolution, milestones, and achievements, or production process, helps establish your business as transparent and trustworthy, encouraging visitors to continue engaging with your brand.
- Mobile Friendliness: A timeline widget helps make the content mobile-responsive, so that it responds to different screen sizes. This encourages visitors to engage with your content on the go and increases mobile traffic to your site.
- Content Retention: A well-structured timeline feed maintains information hierarchy, which helps the brain build “schemas” around the content, making it easier to understand and remember. This encourages site visitors to engage with the content or explore related information on your website, increasing dwell time.
Timeline Widget Use Cases by Industry
Almost every business or brand stands to gain from displaying a timeline widget on its website. What differs is the application (how they organize the timeline feed) and purpose (what they intend to communicate).
Below are the various ways different sectors can leverage timeline widgets to boost visitor engagement:
- Technology & SaaS: Most software companies use timeline widgets to visualize product development roadmaps, such as highlighting when key features were/will be rolled out. Users could pair a timeline widget with a Changelog software that tracks the development cycle and includes internal links to media releases or documentation on the features.
- Educational Institutions: Colleges and universities can use a timeline widget to tell the story of their founding, significant achievements, campus expansions, notable alumni milestones, and accreditation milestones. Additionally, they could use a timeline widget to highlight semester schedules, such as opening dates, registration deadlines, campus events, and end-of-semester exams.
- Health and Medical Agencies: Health professionals and institutions can use a timeline widget to explain the treatment process, from initial consultation through discharge/full recovery, including pre-op preparation, procedure day, immediate recovery, follow-up appointments, and long-term care milestones.
- Legal Services: Attorneys and law firms could use a timeline widget to help their clients understand legal proceedings, such as litigation, from the initial filing to case resolution. It is an effective way to maintain 100% transparency and help manage client expectations about how fast the legal matters can be resolved.
- Real Estate Agencies: Construction companies can use a timeline widget to showcase their portfolio, such as the major projects they have completed. They could pair it with a testimonials widget to display positive reviews from previous clients to boost social proof.
How to Choose the Right Timeline Widget Layout
The timeline widget layout you choose not only impacts how you showcase information on your website, but also how visitors engage with the content. As such, choose a layout that suits the content you want to showcase and the devices your target audience uses.
The core elements to consider include:
- Check Content Volume: Determine the number of timeline entries you need. A horizontal layout works best for fewer than 10 items to minimize swiping. In contrast, a vertical layout can handle unlimited entries, making it suitable for long timelines.
- Decide on Information Hierarchy: Determine whether all the milestones/headings require equal or varying visual weight. A horizontal timeline layout helps give equal attention to all entries. In contrast, a vertical setup can create presumptions, such as a product feature being new or outdated, depending on where it is positioned on the timeline.
- Assess Device Usage Patterns: Use a vertical timeline layout if your audience is predominantly mobile users. However, if most users access your site on a PC, you can use either layout, depending on the content volume.
- Consider the Available Space: Horizontal timeline layouts often demand the full width of a web page, while vertical timelines can be collapsed into a sidebar or pop-up.
- Test for Readability: Preview the chosen layout on different screen sizes to determine the option that works best on most, if not all, devices.
Horizontal vs. Vertical Timeline Design Inspiration
A good timeline widget should let you display your story either horizontally or vertically, depending on the events you are highlighting or the available space.
Let’s cover some best use cases for each option:
Horizontal Timeline Design
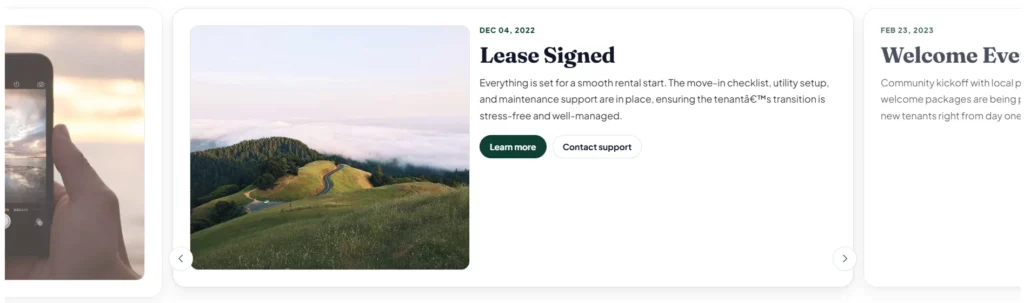
A horizontal layout functions similarly to a carousel, displaying events from left to right. Usually, the events don’t fit on the screen, so the timeline feed includes navigation buttons to help website visitors scroll through it.
This layout works well for wide screens like PC monitors or timelines with a limited number of events (up to five) that may look tacky when displayed vertically.
Vertical Timeline Design
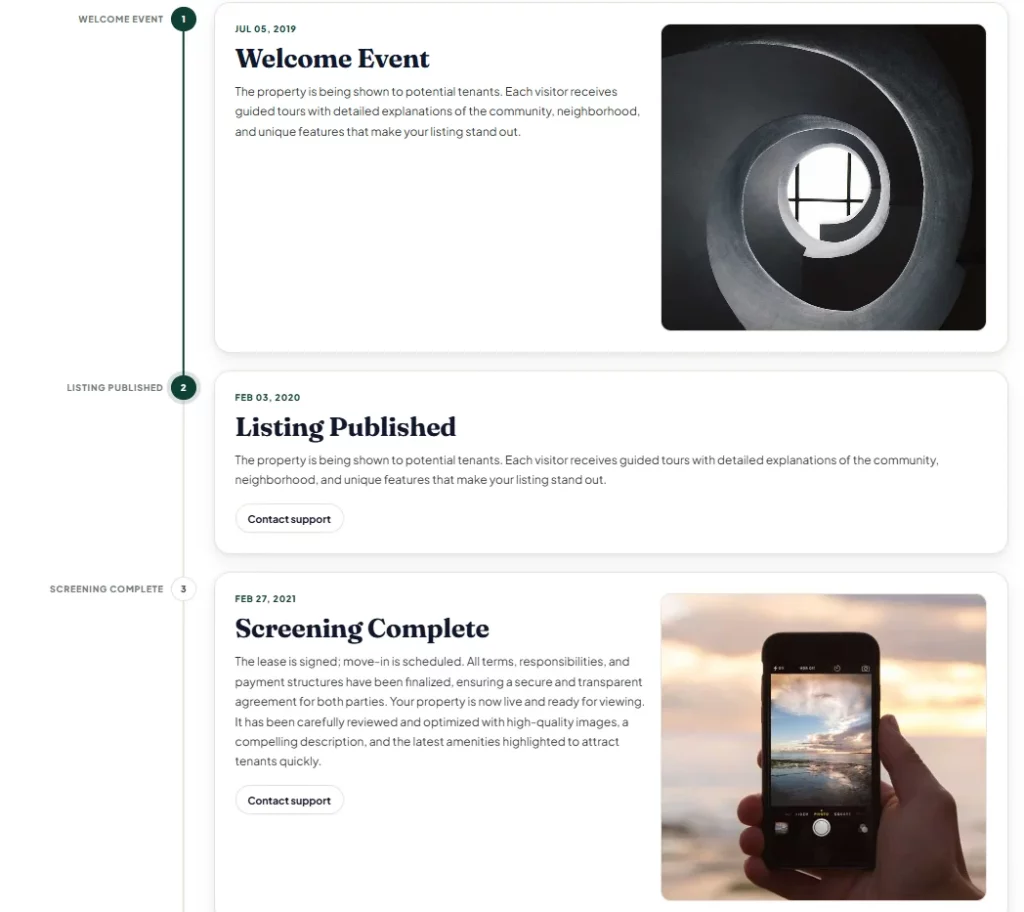
A vertical timeline layout involves displaying events from top to bottom in a chronological order. Usually, there’s no limit on whether the top event should be the oldest or most recent one, so long as they are arranged in the correct sequence.
Suitable use cases for a vertical timeline include long histories with 10+ events, displaying project logs like a changelog widget, and for mobile-first websites.
Customization Tips for Maximum Impact
To maximize the impact of your site’s timeline widget, it has to have an engaging design and provide concise information.
Style your timeline widget to boost your website’s visitor engagement:
- Customize the Timeline Widget: Use short event titles and keep descriptions brief to avoid cluttering the timeline. You should also use consistent color schemes, fonts, and spacing to maintain your website’s image.
- Choose the Right Layout: Align your widget layout with your content and your target audience to ensure a seamless user experience. For example, a vertical layout works best for mobile users and when presenting long histories. On the other hand, horizontal layouts are ideal for desktop users. Lastly, interactive layouts are excellent for providing an overview and detailed content on a subject.
- Incorporate Visual Cues: Use high-quality images, icons, and color-coded groups to categorize events and convey their significance, enhancing your story’s impact. Additionally, include UX best practices such as descriptive labels, keyboard navigation, and alternative text for images, to enhance accessibility for visitors with sensory impairments.
- Add a CTA: Placing call-to-action statements strategically to encourage site visitors to continue engaging with your website. Use CTA buttons such as “Read case study,” “Request demo,” or “Register,” for lead generation. Alternatively, add a featured articles widget highlighting blogs related to events in the timeline widget.
- Use a Mobile-First Design: Since most visitors access your site on mobile devices, ensure your widgets have mobile-friendly controls. Consider using large fonts and collapsible panels to make navigating the widgets easier. This allows you to hide nonessential visuals on smaller screens.
Tips to Improve SEO and Website Performance After Using the Timeline Widget
Adding a timeline widget to your website improves visitor engagement only if it doesn’t degrade your site’s loading speed or performance. A well-optimized timeline widget boosts your website’s SEO performance and encourages visitors to engage with your site longer.
Use these practical tips to get the most out of your timeline widget:
- Optimize Images and Media: Heavy images exhaust your website’s bandwidth and increase loading time, which increases bounce rates. To avoid this, compress the images and use thumbnail previews for videos to keep the timeline feed visually appealing, while still maintaining your website’s loading speed.
- Structure the Data for Better Indexing: Use proper HTML5 semantic elements, such as time tags for dates and heading hierarchy for milestone titles, to help search engines contextualize the content and index the feed.
- Ensure Mobile Responsiveness: Pick a widget that uses a mobile-first design to ensure the timeline feed is auto-responsive to different screen sizes and gives visitors a consistent UX regardless of the device they use.
- Use Lazy Loading: Configure the timeline widget to load only after key design elements are visible or when visitors scroll to that section, reducing impact on site load speed.
- Include Keyword-Rich Content: Incorporate relevant keywords into the milestone titles and content to help your website appear in related searches and rank in SERPs.

Frequently Asked Questions (FAQs)
Let’s wind up by answering popular questions about adding a timeline widget to your website:
Does the Webynize Timeline Widget Work on All Website Platforms?
Yes. Our Webynize timeline widget is compatible with all major website platforms, including Webflow, Squarespace, Shopify, HTML, and WordPress.
This means you can use the same embed code across your platforms.
Can I Rearrange or Edit Milestones After Publishing?
Yes. Most timeline widgets include a dashboard that lets you add, remove, or rearrange milestones.
Typically, your edits are published instantly after saving, without writing any code.
Can I Add Links or Buttons to Each Timeline Event?
Yes. You can add links or buttons to each timeline event to direct your site visitors to relevant case studies, testimonials, and product pages, or to lead them to your conversion funnel.
Does the Timeline Widget Affect My Website’s Loading Speed?
Yes and no. A timeline widget shouldn’t affect your website’s loading speed unless you add multiple plugins to the same web page.
Conclusion
Your story can help you create a community around your brand. But this is only possible if website visitors actually read it.
Visitors choose to stay or leave your website on a whim, so you only have a few seconds to impress them.
A timeline widget changes the equation in your favor by helping you transform dense information into visual narratives that capture visitors’ attention quickly.
At Webynize, we help you tell your brand story by providing a convenient way to display a timeline widget on your website. The best part? It takes minutes, not hours, and you’ll have full autonomy over how your timeline widget looks with no coding skills required. Additionally, our timeline widget integrates with all major web builders, so you only need to create it once and paste it across your platforms.
Join 1,000+ websites using Webynize to tell stories that grow their following. Create a Timeline widget today.
Leave a Reply